")
Tired of wobbly lines, smudged wings, or that frustrating “I tried” look instead of the fierce, flawless finish you crave? You’re not alone. Eyeliner, while transformative, can feel like navigating an obstacle course blindfolded. But fear not! Achieving sharp lines, sultry smudges, or perfectly subtle definition is absolutely within your reach. This guide delivers 15 expert eyeliner tips for a flawless look, demystifying the process from beginner basics to pro-level tricks. Whether you’re taking your first tentative steps or looking to refine your signature style, these step-by-step techniques will elevate your eye game. Get ready to unlock the secrets to precision, longevity, and undeniable confidence.
1. Prime Your Canvas: The Non-Negotiable First Step
Table of Contents
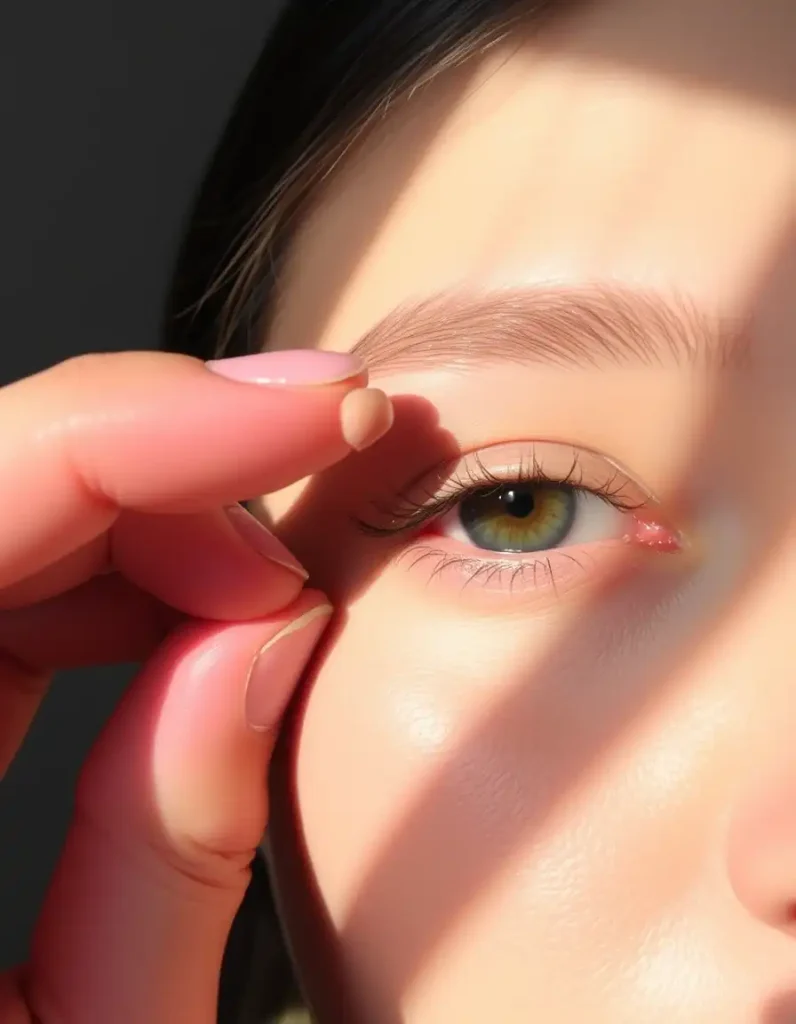
Think of your eyelid like a painter’s canvas. Would you start on a greasy, uneven surface? Absolutely not! Eyelid primer is your secret weapon for eyeliner tips for a flawless look. It creates a smooth, even base that grips onto your liner, preventing it from sliding into creases or fading by lunchtime. It also neutralizes any discoloration on your lids, making your liner color pop true. For oily lids, this step is non-negotiable. Simply apply a tiny amount (pea-sized!) from lash line to brow bone, blending gently with your finger or a small brush. Let it set for 30 seconds before moving on. Trust us, this foundational step makes everything that comes after easier and longer-lasting. (Keywords: eyeliner tips for flawless look)
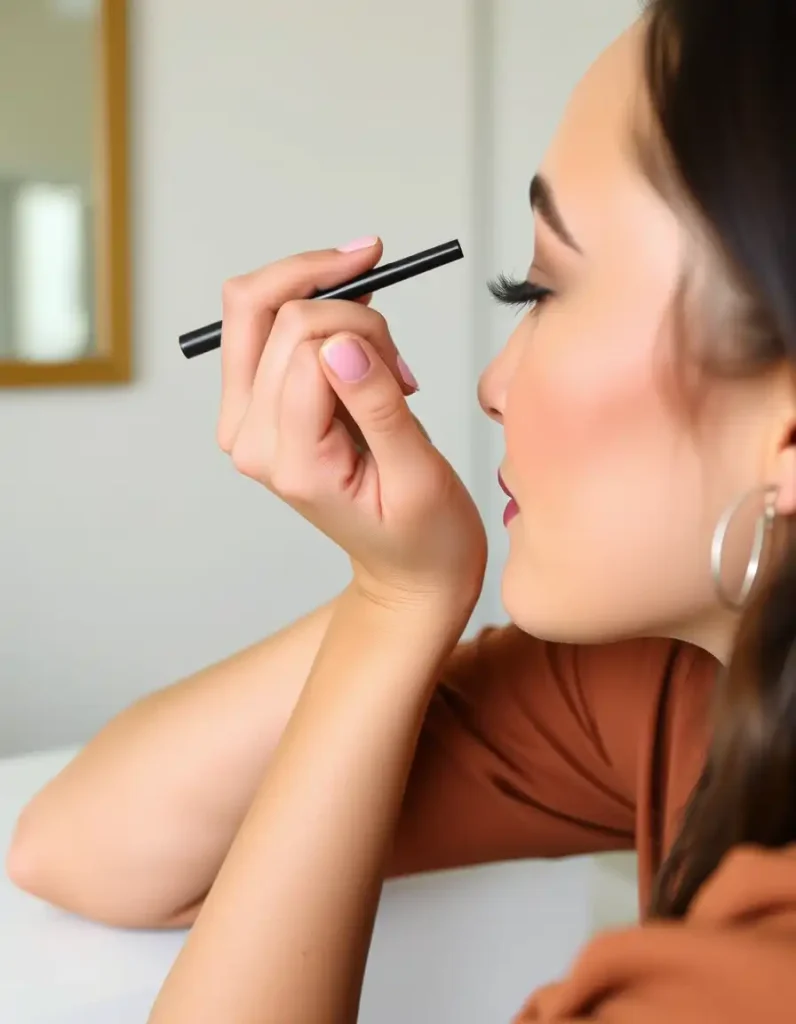
2. Choose Your Weapon Wisely: Pencil, Gel, Liquid, or Felt?
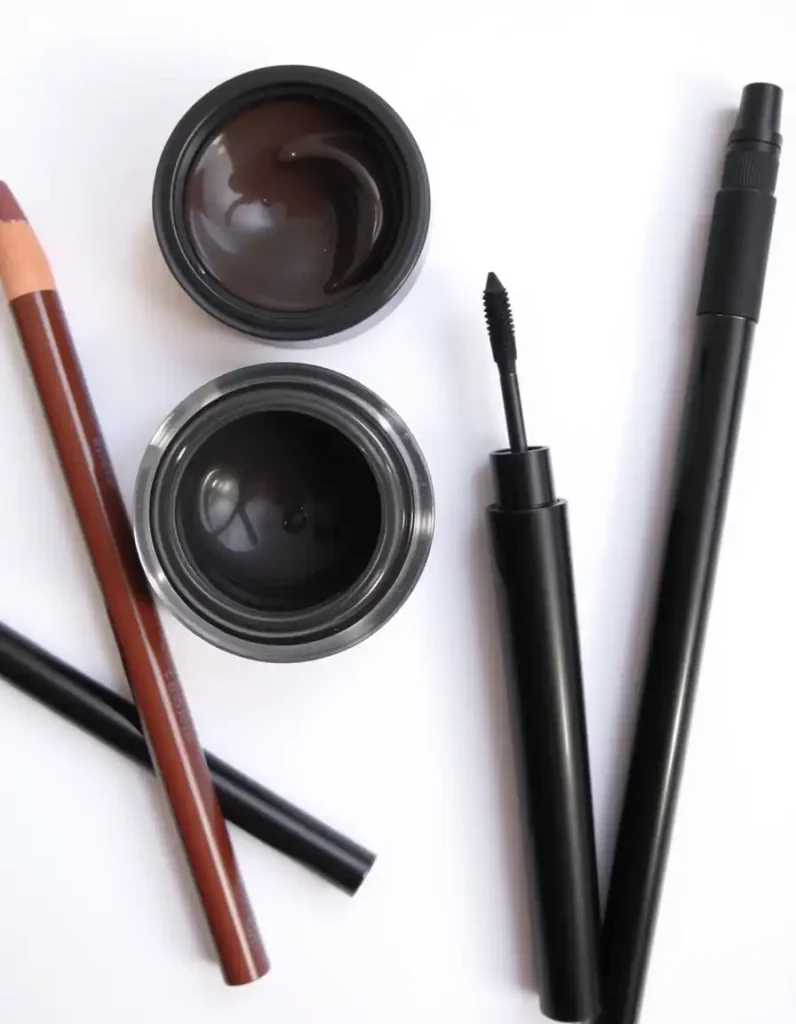
Not all eyeliners are created equal, especially when you’re figuring out how to apply eyeliner for beginners. Each type offers different benefits:
Pencil: Great for beginners! Forgiving, smudgable (great for smoky looks), easy to control. Opt for soft, creamy formulas that glide without tugging. Ideal for tightlining and the waterline.
Gel (Pot & Brush): Offers intense pigment and staying power. Requires a bit more skill with an angled brush but allows for precise lines or smudged effects. Fantastic for wings.
Liquid: Delivers the sharpest, most dramatic lines and wings. Best for graphic looks. Can have a learning curve due to its fluidity. Look for felt-tip or brush-tip applicators; felt-tips are often easier for beginners to control.
Felt-Tip Pen: Combines the precision of liquid with the ease of a pen. Excellent for beginners mastering wings. Start here if sharp lines are your goal! Consider your desired look and skill level when selecting. (Keywords: how to apply eyeliner for beginners)
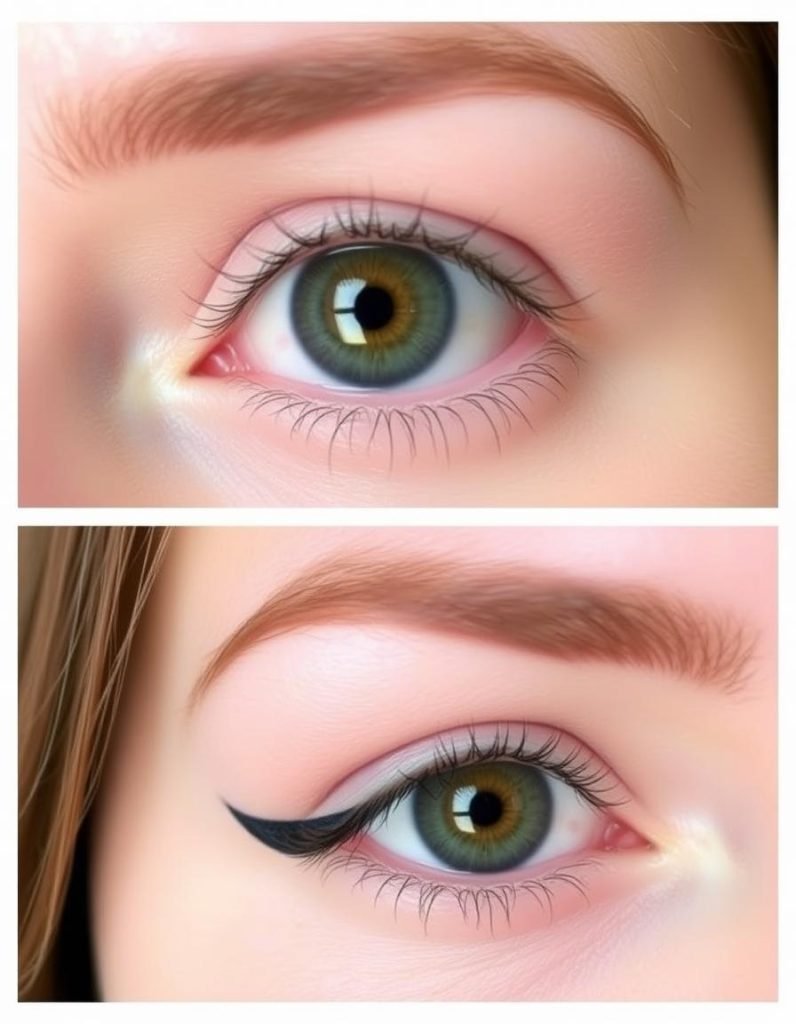
3. The Magic of the Dot Method: Mapping Your Wing
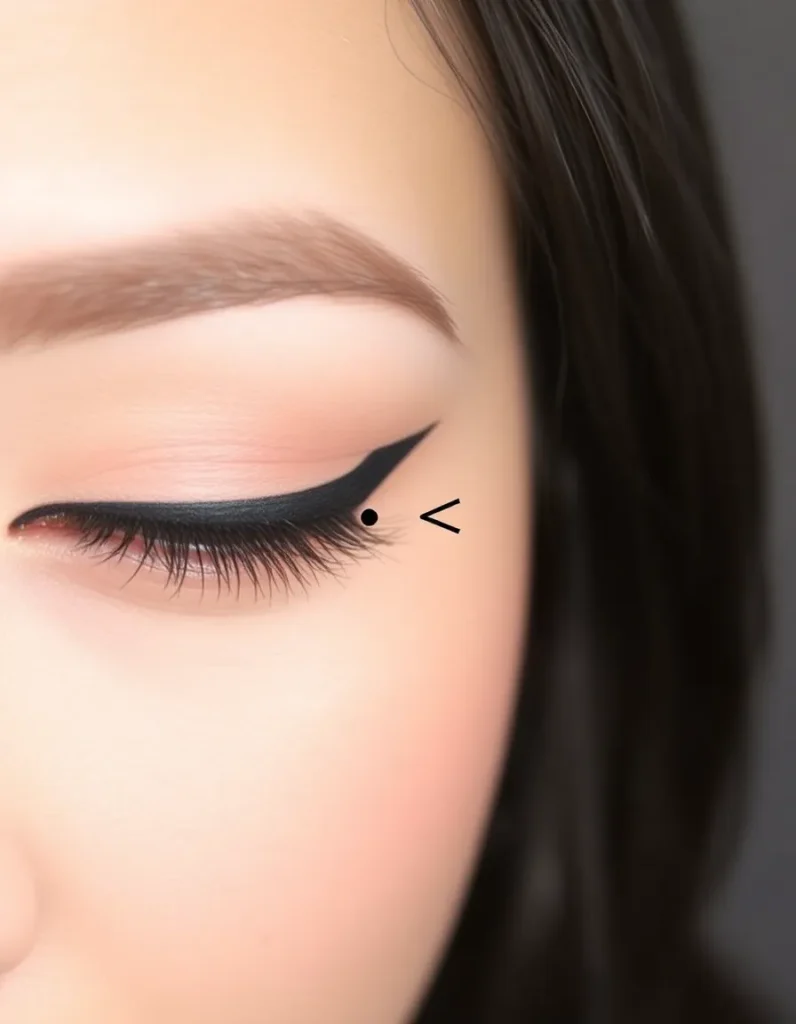
Wings feeling lopsided? The dot method is a game-changer for precision. Look straight ahead into a mirror. Imagine extending your lower lash line upwards towards the end of your eyebrow – this is your wing direction guide. Now, using your liner (pencil or felt-tip works well here), place a small dot exactly where you want the tip of your wing to end. Repeat on the other eye, constantly checking straight on to ensure symmetry. This dot becomes your anchor point. When you draw the wing, simply connect your upper lash line to that dot. No more guesswork, no more uneven flicks! This is one of the most reliable eyeliner tips for a flawless look, especially for winged styles. (Keywords: eyeliner tips for flawless look)
4. Connect the Dots: Building Your Wing Structure
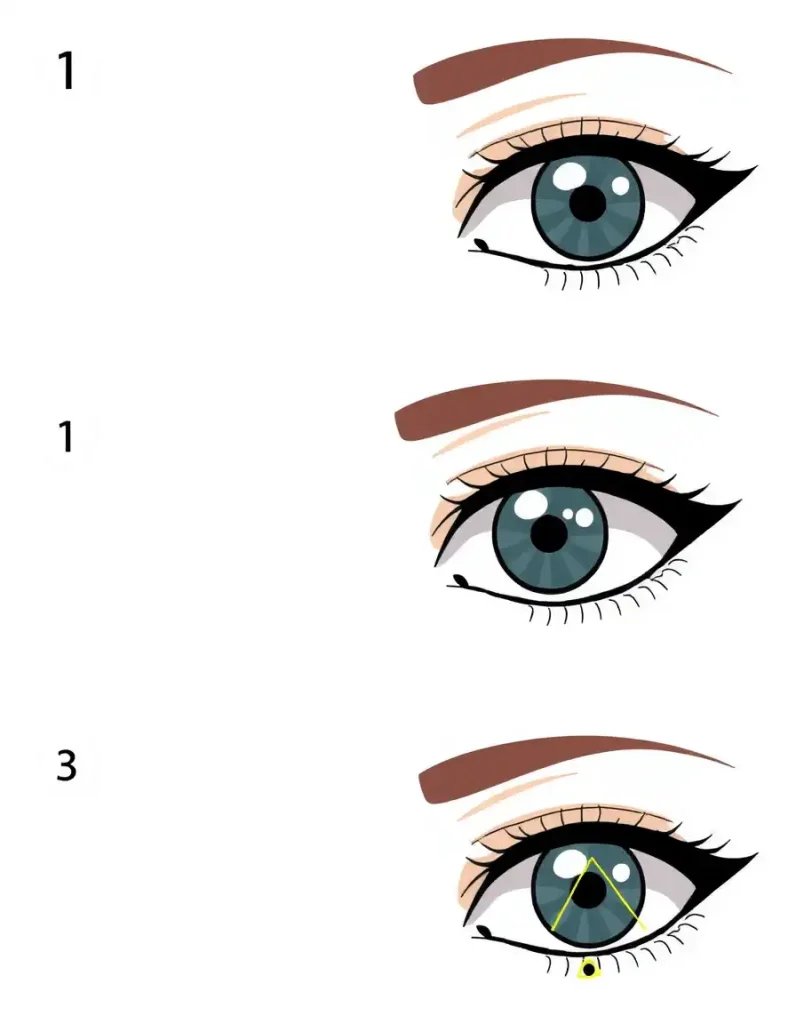
Now that your anchor points are set (Tip #3), it’s time to build the wing’s structure. Starting from the outer corner of your upper lash line (not the inner corner!), draw a thin, upward line connecting directly to your pre-placed dot. This forms the “tail” of your wing. Keep this initial line thin; you can always thicken it later. Next, look straight ahead again. From about the middle of your upper lash line (or where your iris ends, depending on your eye shape), draw a second line downwards to meet the end of your first line (the tail) at the dot. You’re essentially creating a small triangle frame. This step-by-step approach ensures your wings match and have a clean, intentional shape. Fill in the triangle for a solid wing. (Keywords: eyeliner tips for flawless look)
5. Tightline Like a Pro: The Secret to Fuller Lashes

Want the illusion of thicker, denser lashes without clumpy mascara? Tightlining is your best friend. This technique involves applying liner between your upper lashes, right at the root, on the waterline itself (the rim above your lashes). Use a soft, waterproof pencil liner (gel can sometimes be too harsh here) in black or dark brown. Gently lift your upper lid and look down. Carefully dot the liner into the spaces between your lashes, wiggling the pencil slightly. Avoid dragging. This fills in any gaps at the lash base, creating a seamless, natural-looking fullness. It’s subtle but makes a massive difference in defining your eyes! (Keywords: eyeliner tips for flawless look)
6. Steady Those Hands: Elbows & Pinkies are Key
Shaky hands derailing your perfect line? You need leverage! Always rest your elbow on a stable surface like a table or countertop. This provides a solid foundation. Then, bring your pinky finger into play. Gently rest the side of your pinky finger (the part near your nail) on your cheekbone. This acts like a tripod, stabilizing your entire hand and dramatically reducing wobbles. It might feel awkward at first, but it’s incredibly effective, especially when using liquid liner or drawing precise wings. This simple trick is often the missing link for beginners mastering how to apply eyeliner for beginners. Breathe steadily and take your time. (Keywords: how to apply eyeliner for beginners)
7. Look Down, Not Straight: The Best Angle for Application
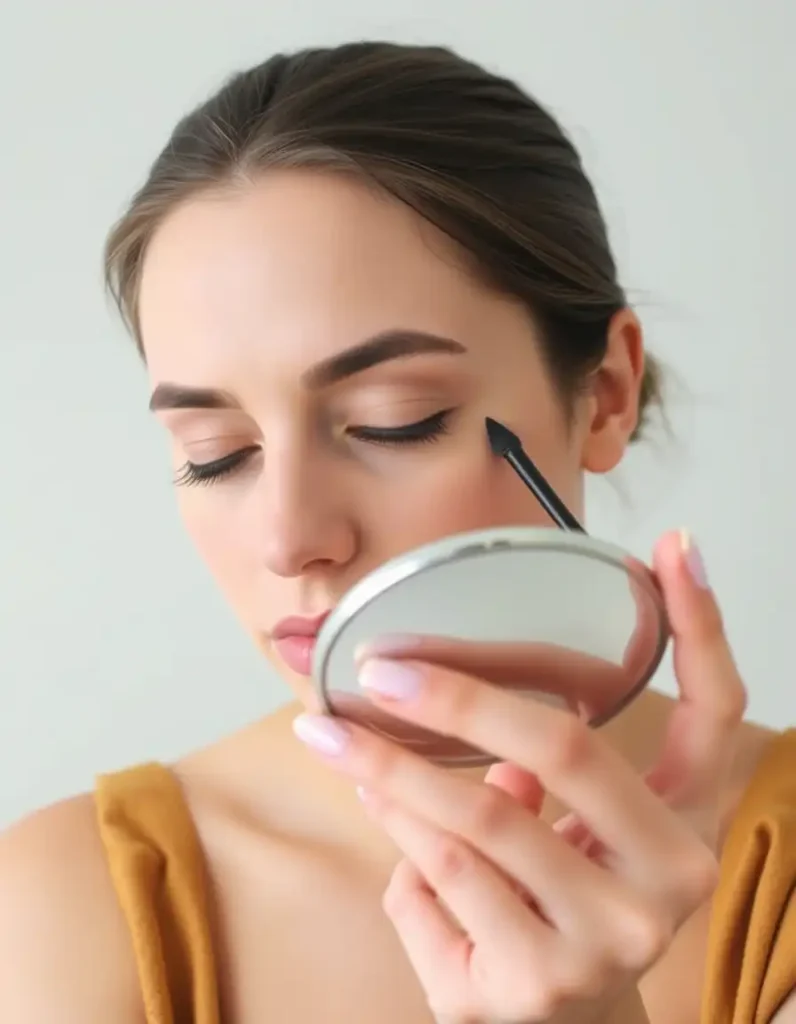
Trying to apply liner while staring straight ahead often leads to pulling the lid, resulting in uneven pressure and a distorted line. Instead, position your mirror below your eye level. You want to look down into the mirror with your eyes only, keeping your head straight. This naturally causes your lid to lower slightly without you needing to stretch or pull it with your fingers. You can gently lift your brow upwards with a finger placed near your temple if you need a bit more visibility, but avoid pulling the lid taut sideways. Looking down gives you a clearer, more relaxed view of your lash line for smoother application. (Keywords: eyeliner tips for flawless look)
8. Start Thin, Build Thick: Avoid the Heavy-Handed Trap
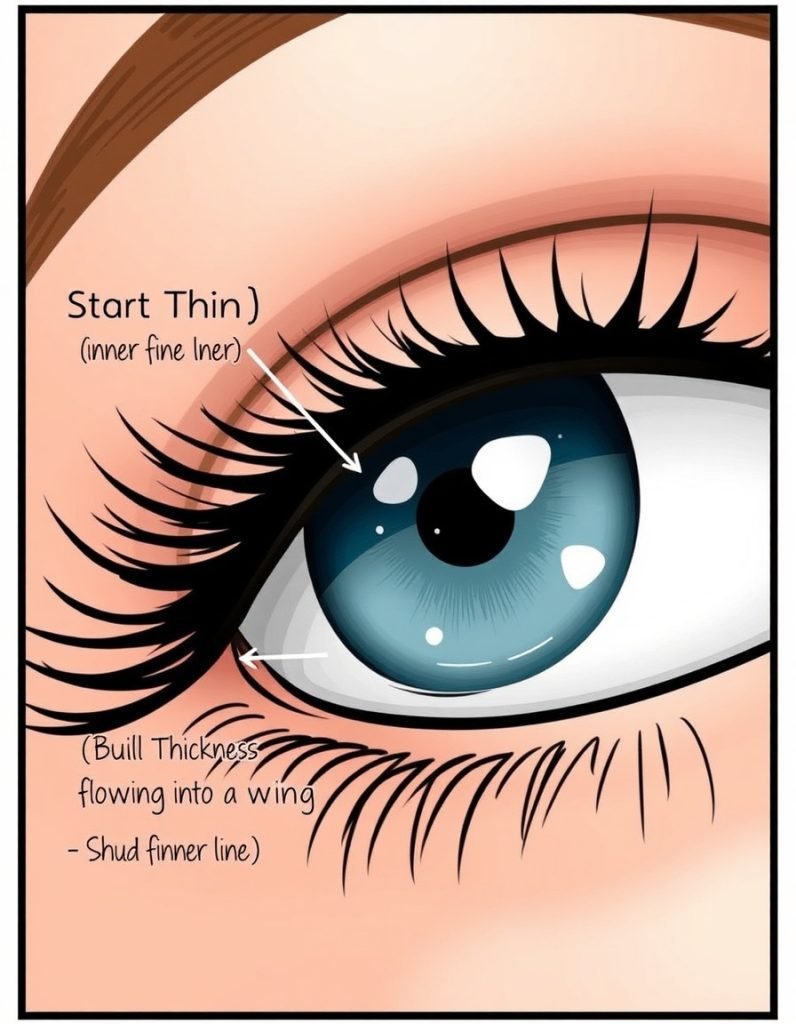
The biggest mistake? Starting thick at the inner corner. This closes up the eye and looks harsh. Instead, begin your line incredibly thin, right at the inner corner (or even start 1/3 of the way in for a more open look). Use light, short strokes or dashes close to the lash line. As you move towards the outer corner, gradually increase the thickness. Thicken it most significantly as you approach the wing area. This technique creates a more flattering, lifted effect and gives you way more control. You can always add more liner if needed, but taking off excess is messy! (Keywords: eyeliner tips for flawless look)
9. Clean Up Like a Pro: Concealer & Angled Brush
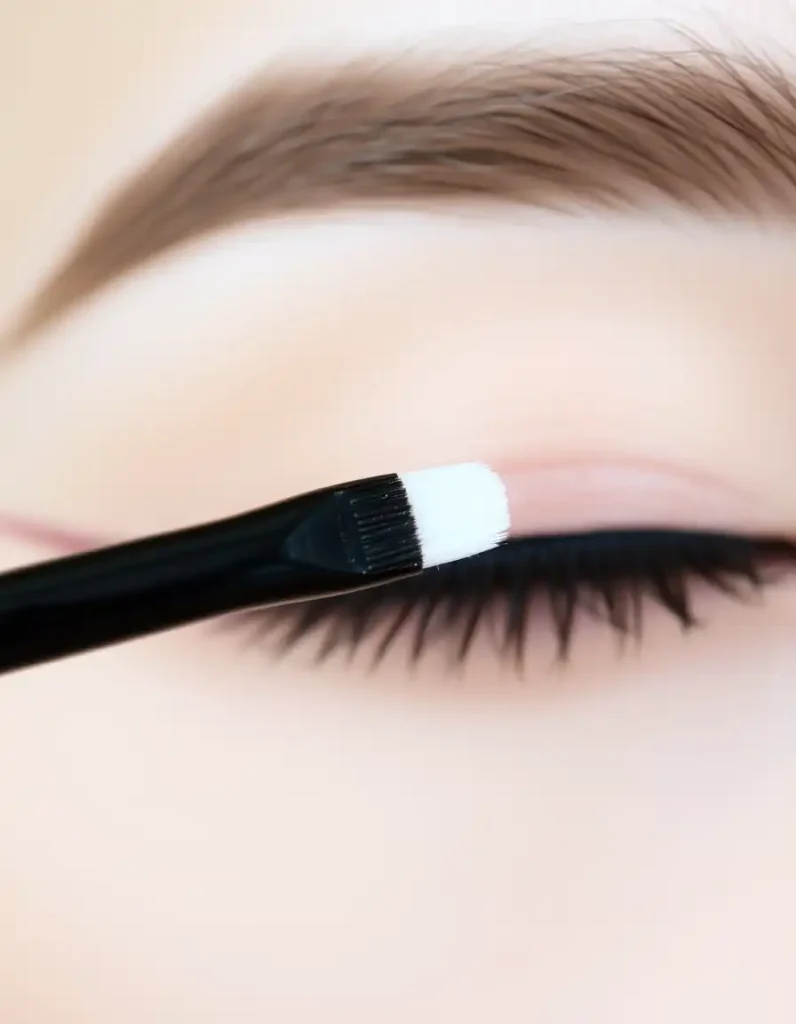
Even the pros need clean-up sometimes! Don’t panic about a slightly wobbly edge or smudge. The secret weapon? A tiny drop of concealer (one shade lighter than your skin tone) and a small, flat, angled brush (like a lip brush or small concealer brush). Dip just the very tip of the brush into the concealer. Gently swipe it along the edge of your liner where you need to sharpen or correct, using the straight edge of the angled brush as your guide. This erases mistakes and creates an impossibly crisp, sharp line that looks airbrushed. It instantly elevates your look from “good” to “flawless.” (Keywords: eyeliner tips for flawless look)
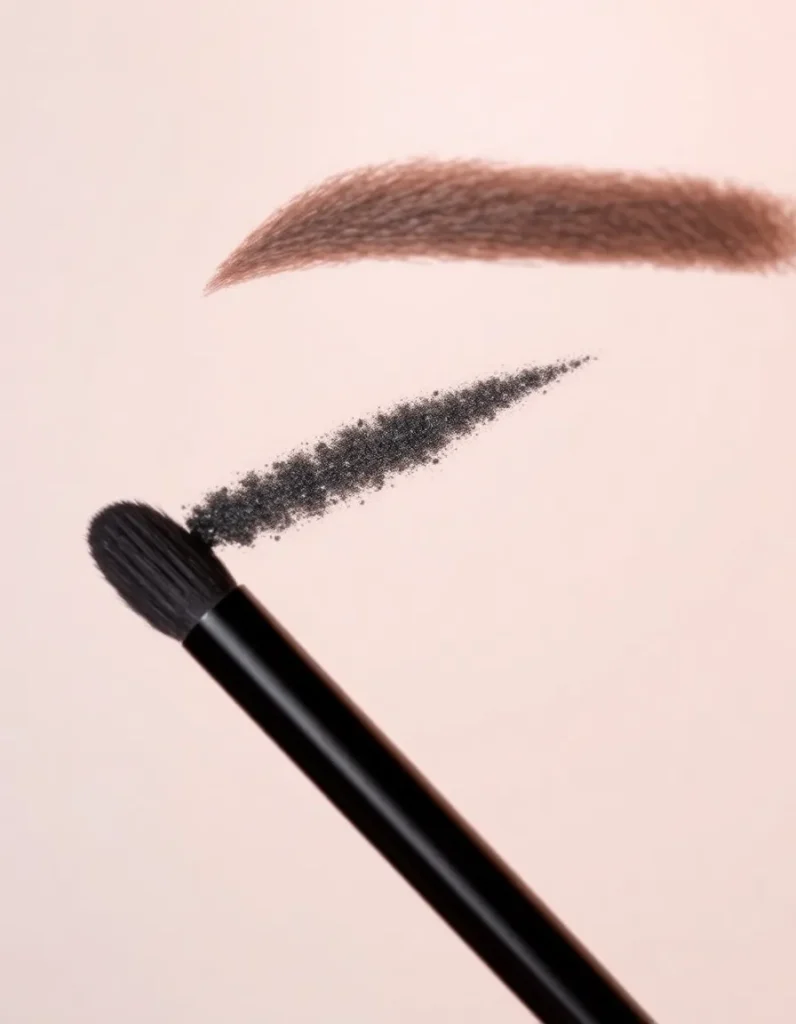
10. Set It & Forget It: Locking Liquid & Gel in Place
If you’re using gel or liquid liner (especially on oily lids), setting it with powder is the ultimate insurance policy against smudging and fading. Immediately after your liner has dried (crucial!), take a small, dense, angled eyeshadow brush and dip it into a matching eyeshadow (e.g., black shadow over black liner, brown over brown). Gently pat (don’t swipe!) this shadow directly on top of your liner, focusing on the areas most prone to transfer (like the outer wing and upper lash line near the crease). This sets the liner, absorbs any residual oils, and boosts longevity dramatically. For pencil liner used on the waterline, setting the lower waterline with shadow can also help prevent transfer. (Keywords: eyeliner tips for flawless look)
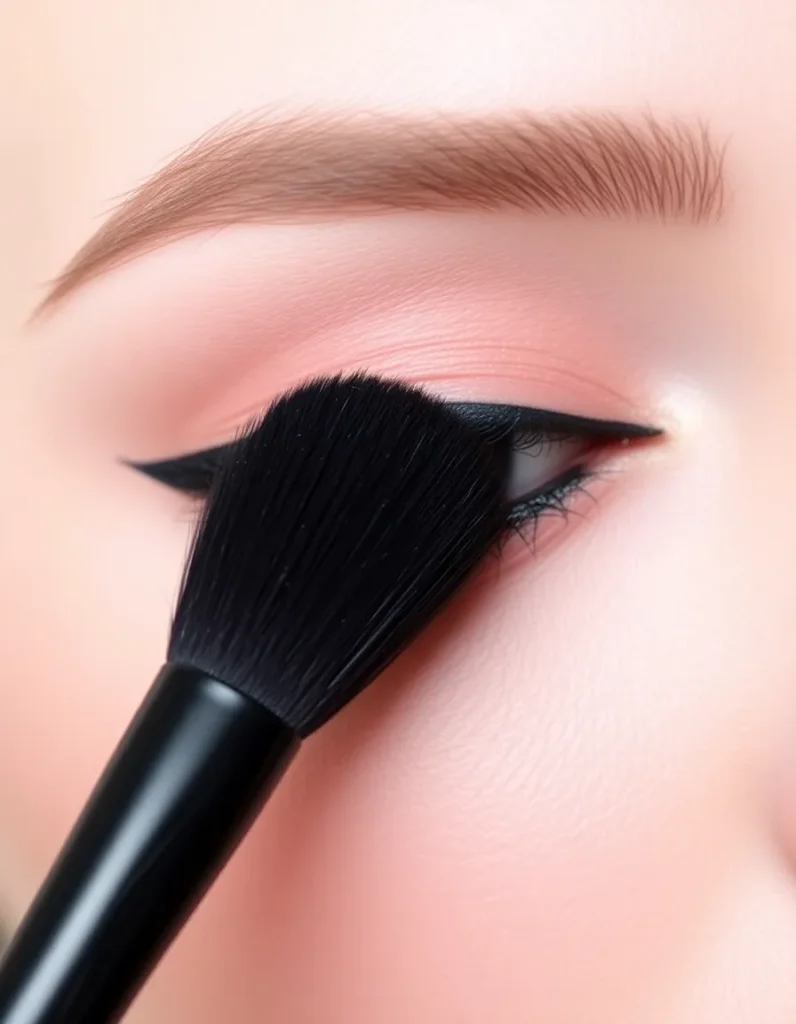
11. The Easiest Smokey Liner: Effortless Sultry Eyes
Want smoky eyes without the complicated shadow blending? Transform your pencil liner! Apply your pencil liner (kohl works great) along your upper lash line, making it slightly thicker than usual. Then, before it sets, take a small, dense smudging brush (a pencil brush or a tiny dome brush). Gently wiggle and smudge the outer half of the liner upwards and outwards, softening the edge and creating a diffused, smoky effect. You can also smudge a little along the outer third of your lower lash line. This creates instant depth and sultriness in seconds – the definition of the Easiest Smokey Liner. Set lightly with matching powder shadow if needed. (Keywords: Easiest Smokey Liner)
12. The Easiest Eyeliner Hack EVER: Tape as Your Stencil
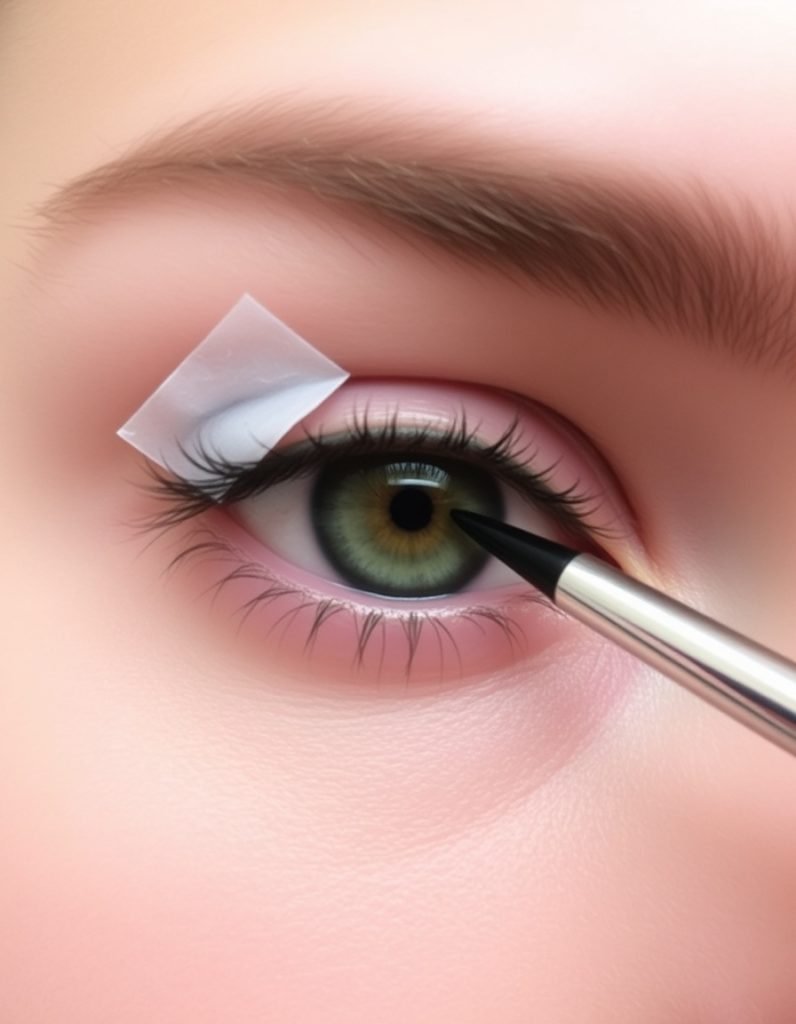
For truly sharp, symmetrical wings that look like they were done by a makeup artist, reach for the humble Scotch tape! This is arguably the Easiest Eyeliner Hack EVER. Cut two small pieces of tape (make sure it’s not too sticky – dab it on the back of your hand first to remove excess tack). Place each piece diagonally from the outer corner of your eye, following the angle you want your wing (use your lower lash line as a guide, as in Tip #3). Press down gently. Now, apply your liner as usual, right up to the edge of the tape. When you peel the tape off – voila! You’re left with an impossibly sharp, perfectly symmetrical wing. This hack works wonders for liquid or gel liner. (Keywords: Easiest Eyeliner Hack EVER)
13. White or Nude Waterline: The Eye-Opening Trick
Tired of eyes looking smaller or tired? Swap black on your lower waterline for a nude or white pencil. Applying a soft, creamy white, beige, or peach liner to your lower waterline (the rim below your lashes) instantly makes your eyes look bigger, brighter, and more awake. It counteracts redness and creates the illusion of more visible sclera (the white part of your eye). This is a subtle but powerful trick, especially for daytime looks or when you’re feeling fatigued. Ensure the pencil is safe for the waterline and creamy enough for comfortable application. (Keywords: eyeliner tips for flawless look)
14. Embrace Your Eye Shape: Tailor Your Technique
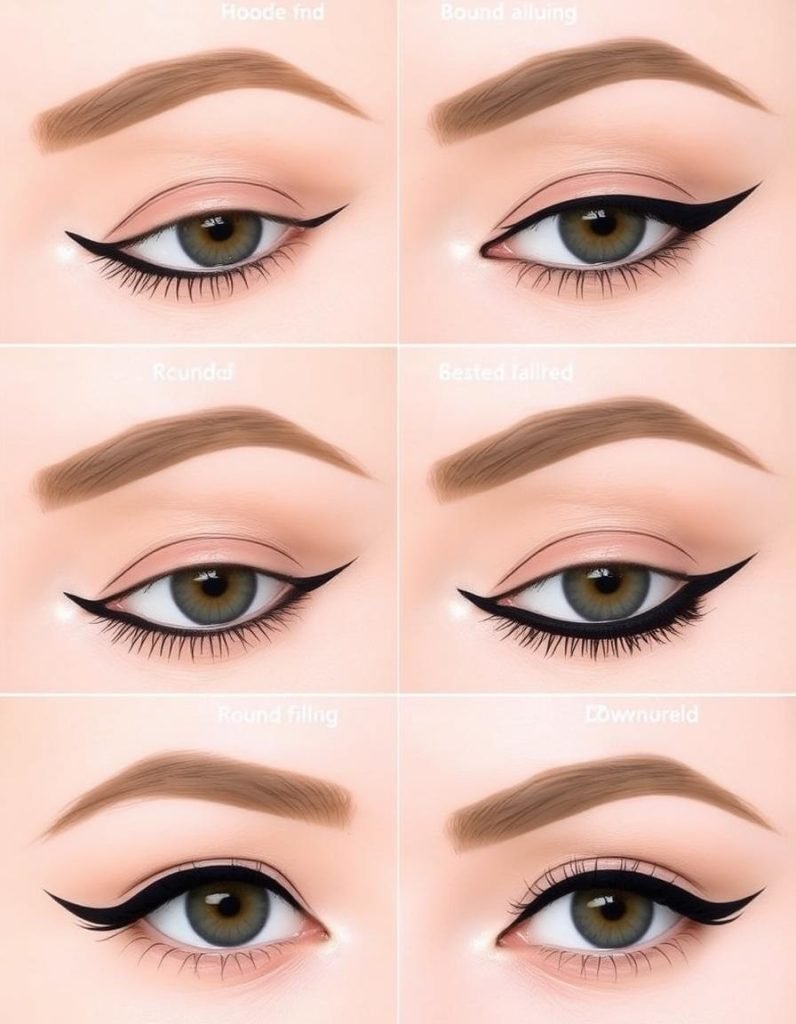
One size does not fit all in eyeliner! Your unique eye shape dramatically affects what techniques are most flattering. Always adapt:
Hooded Eyes: Focus the thickness and wing on the outer third. Keep the inner half very thin. Create your wing looking straight ahead with eyes open to ensure it’s visible above the fold. Avoid thick lines across the entire lid that disappear.
Almond Eyes: Lucky you! Most techniques work well. Experiment with different wing styles and thicknesses.
Round Eyes: Extend the wing horizontally rather than upwards to elongate. Lining the outer 2/3 of the upper lash line thicker can also create length.
Downturned Eyes: Focus the wing upwards, lifting the outer corner. Keep the line thinner at the inner corner, thickening and lifting dramatically at the outer corner.
Monolid Eyes: Don’t be afraid of thicker lines! A bold liner is often stunning. You can create a wing above the natural fold or experiment with graphic shapes. Research techniques specifically for your shape – it makes all the difference! (Keywords: eyeliner tips for flawless look)
15. Practice Makes Permanent (Be Patient & Experiment!)
Here’s the ultimate, non-negotiable tip: Practice! Don’t expect perfection on day one, week one, or even month one. Eyeliner is a skill, and like any skill, it improves with consistent effort. Dedicate 5-10 minutes before you wash your face at night to play with different liners, techniques (like the dot method or tape trick), and styles. Experiment with colors – maybe a deep plum or navy instead of black? Try a tiny wing, a graphic line, or a smudged lower lash line. There are no rules, only what makes you feel confident. Celebrate small improvements. Remember, even the most iconic makeup artists started somewhere. Be patient, be kind to yourself, and embrace the journey to mastering your perfect eyeliner tips for a flawless look. (Keywords: eyeliner tips for flawless look)
Conclusion: Your Flawless Liner Awaits
Mastering eyeliner isn’t about magic; it’s about understanding the tools, the techniques, and your unique features. These 15 expert eyeliner tips for a flawless look have armed you with everything from the foundational prep (prime those lids!) and beginner-friendly hacks (hello, tape trick and pinky stabilization!) to pro-level precision (dot method, concealer cleanup) and eye-opening tricks (nude waterline, shape adaptation). Remember the power of the Easiest Smokey Liner transformation and that game-changing Easiest Eyeliner Hack EVER.
The most important tip? Practice with patience. Don’t get discouraged by a wobbly line today – it’s just a step towards the sharp wing of tomorrow. Experiment fearlessly, embrace what flatters your eyes, and most importantly, have fun with it! Your signature, flawless eyeliner look is absolutely within reach. Now go forth and define those eyes with confidence! ✨


